Tuesday, March 8, 2011

Perfectly Pink!

Hi everyone! Happy Tuesday (Mardi Gras as a mater of fact) I have a really fun projectto share with you, but first the winner of my blog candy for Jenn's Birthday blog hop.
The winner is Katieo! I have contacted her and if she doesn't respond then we'll pick another winner next Tuesday OK?
Now on with the project:

My project today features a Live with Prima kit designed by Lolly Chessie. She made hers in a totally awesome teal for the Live with Prima class on December 30th and here I am over 2 months later finally making my version...in PINK!

Just a reminder, here is Lolly's terrifically teal version and here is the link to her recorded Live with Prima class showing you how she made it.

What I did differently with mine (besides the obvious pink color) is I painted my wood box white.
So here is what the box looks like, full of velvet Prima flowers:

First, you take all the flowers out and save them for another use :)

Then you take the wooden grid inside out. Now, it's glued in just a little bit so it takes a little gentle persuasion to pop it out but don't worry, it will come out.

Next, I painted all the edges white. Not a heavy coat, just enough to lighten it up. Of course you could paint yours whatever color you like or omit the paint and leave it wood.

I didn't paint the bottom of the inside because you're going to glue the patterned paper in there.

I cut my Prima patterned paper to fit the inside of the box and then for some extra pizazz I sprayed it with Dazzling Diamonds Glimmer Mist and I stamped a script background in red ink.
Following Lolly's directions, I cut the remainder of my pattered paper to the shape of the felt boarder and glued it to the glass lid of my box.
And finally I made the flowers as Lolly showed in her class and decorated the outside (and a little of the inside too) with the flowers from this kit.

Your Memories Here has these kits available in both pink and teal. They include all the Prima products you need to make one of these boxes (or a version of your own) plus have lots of other flowers left over!
Just remember the Live with Prima classes are FREE and recorded (click here to visit the class archives) so you can go back and watch them whenever you have the time. It's never too late to try out one of these projects!

I hope you have a great day! I'll be back on Friday for the weekly steal.

Tuesday, February 15, 2011

Custom T Shirts - You Can Do It!

Hey everyone! It's another quick, last minute Tuesday post for me. This project took only 10 minutes to complete - seriously!
I wanted to share with you a couple of T Shirts I made for my girls using my Cricut machine.

How do you use a Cricut to make T Shirts (I know you're thinking)? Well, I used one of the great images from the Wall Decor cartridge, the crown, and cut it out of a piece of freezer paper, yep that stuff you buy in the grocery store next to the aluminum foil and wax paper.
That becomes your stencil. Then you simply iron it onto your shirt - shiny side down and it adheres itself into place (but only temporarily) Using your favorite fabric paint or as I used fabric glue and glitter (Tulip Brand - made to be machine washed) apply it to your design. When you're done, just peel up the paper and voila! A custom T shirt.
Here are my lovely assistant's modeling their new fashions:

We still have some Cricut products left in stock at Your Memories Here, but they are clearance priced and once they are gone that's it!

Tuesday, February 1, 2011

Gotta Love Glitter

I've been working on my mini album and have a couple more pages to share with you.
I got a little out of control with the embellishments and it's looking like it's going to be pretty thick, Oh well!

I've used some more of the DCWV Mariposa papers as my backgrounds.

On this page I used a Prima butterfly as my main embellishment, I thought the orange went nicely with the coppery glitter on the paper. I also added the word "dream" that I cut on my Cricut and then sprayed with Sugar Maple Glimmer Mist (I think that is my favorite color of GM right now) I inked all the edges of the page with spiced marmalade distress ink.

On this page I added a side pocket by edging some of the patterned paper with my Alterations On the Edge die (pst... it's a Sizzix die, but I totally use it in my Cuttlebug) and then adhering it to the edge of my page. The little leafy branch was also cut on my Cricut and then I hot glued some Prima mini roses in Sunrise Yellow. The larger flower is a Prima Lilliput rose that was all yellow, but I sprayed the center with some Pomegranate Glimmer Mist for a bit of contrast.

I'm almost finished with this mini and I can't wait to show it to you assembled with all my photos inside.

Tuesday, January 25, 2011

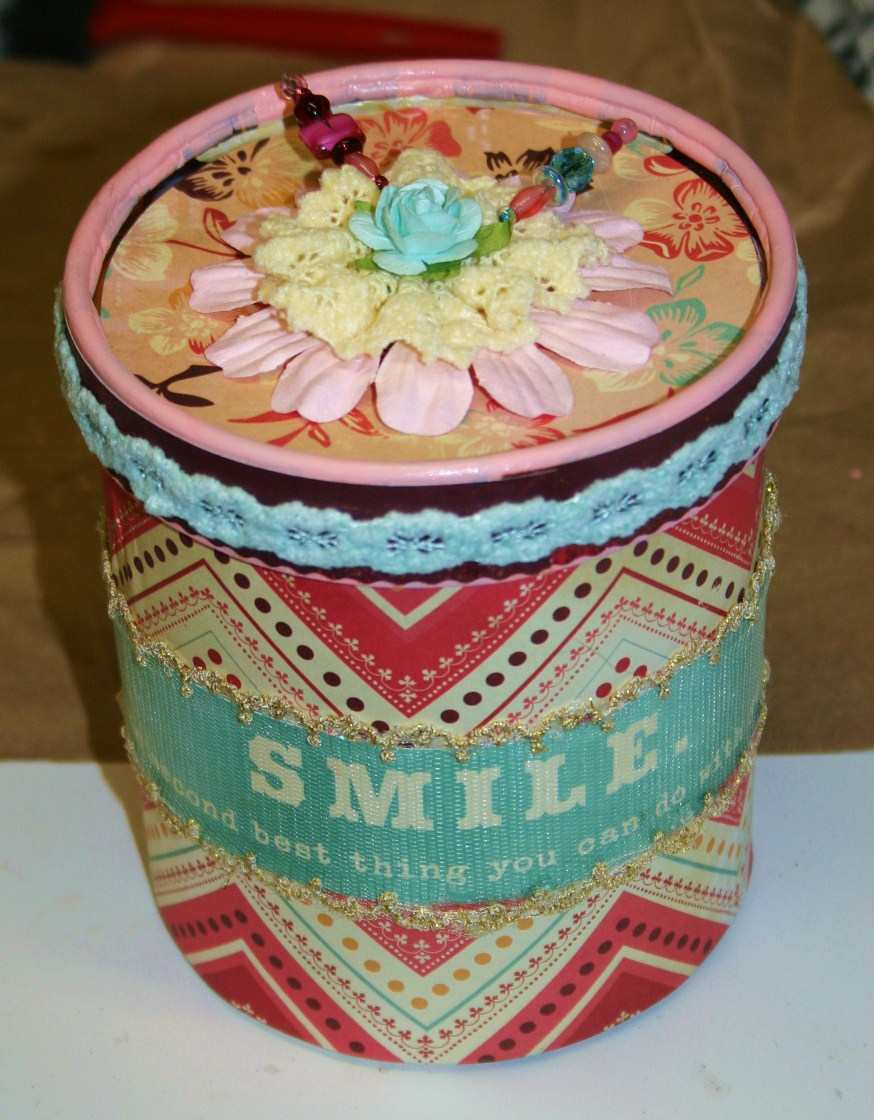
Recycling Can Be Pretty

Well silly me, I posted this today over on the YMH Designs blog but forgot to post over here:) So I'm just a few hours late. Oh well, better late then never!
Today's project requires you to eat an entire carton of ice cream. Do you think you can do that? If your answer is undoubtedly YES! Then you're my kind of crafter :)

First I took said ice cream container and washed it out real good (we don't need to attract any bugs) Then I let it sit on my counter for about a week so my kids could ask me at least 3 times a day "Mom, can I have that ice cream?" and I would answer "no, it's empty" but still they asked every single day. So to end their torture, I finally came up with a plan as to what I was going to do with this container.
*little background story*
A couple of weeks ago the very crafty LollyChops made THESE and I was so inspired by her class that I wanted to make one too. But I keep putting off finishing up that box of cheese (and yes, I know I can wrap it up in plastic and steal the box) but this carton of ice cream came available much quicker ;)
So, an assortment of Cosmo Cricket "Hey Sugar" papers and paper embellies arrived at YMH this weekend and I was in love. Inspiration was born!

Measure your container (mine was 5" tall by 16" around) so I cut my Cosmo Cricket " Be Mine" paper 5"x12" and then pieced in another small piece of paper 5" x 6" to overlap.

I slathered up the sides with Mod Podge and wrapped the paper around. I used clothes pins (as a second set of hands) and rubber bands to hold it in place while the glue dried.

I painted the lid with several coats of pink acrylic craft paint.* At first I didn't think the paint was going to stick because of the shiny finish of the carton but after the first coat dried the rest went on with no problem.

Then I cut a strip of my patterned paper (this is the same paper as the body of the carton, just the reverse side!) I also glued it with Mod Podge and banded it till it was dry.

I kinda skipped ahead with the photos so let me catch you up:
Next I used the "strip tease" card stock with the various funny sayings and patterns on it and selected the one that says "Smile, it's the second best thing you can do with your lips." I used it to make a belly band to go around my carton (and had to piece another bit of paper to fill the gap - remember our circumference is 16" and our paper is only 12") I glued that on with my ATG gun. Then I used my Webster's Pages trims to make a soft aqua band around the lid and the sheer net trim around the belly band ( I used hot glue to attach both of those).

For the lid I cut a 4 1/2" circle out of the "Honey, Honey" paper and glued it in place. Then I added a large, pink Prima flower and gathered some Prima trim into a flower shape and hot glued that down on top of the pink flower and lastly glued an aqua Prima Fairytale rose on the top of that.

I whipped up a couple of beaded hat pins to stick in my flower stack for a little touch of "bling".

For this entire project I used 1 whole sheet of 12"x12" paper, a small strip of the "strip tease" paper and a circle from another sheet (which I could have gotten out of the fist piece of card stock, but I wanted a contrasting paper) So that leaves 10 and 3/4 sheets of card stock plus all the other embellies in the kit for many more projects! This $10 kit goes a looooong way!

This little cute doesn't have a designated purpose yet but since nothing about those papers say that it's for Valentine's day, I'm thinking I can use it for whatever I want!


Tuesday, January 18, 2011

"Free Bird" for all you Skynyrd fans

Happy Tuesday! Did you all have a long weekend too? My girls didn't have school yesterday for Dr. Martin Luther King's Day so we kinda vegetated all day :)
I did a little more work on my mini album this weekend (it's a slow work in progress) Remember the cover page HERE

The background paper on this page is from the DCWV Mariposa stack. I'm using the 8"x8" stack for this since my mini album is only a 6"x6" so there is minimal waste and the images are more to scale than if I were to use the 12"x12" papers cut down.

The bird cage on my page was cut on my Cricut using the Bloom Lite cartridge. I cut out the first layer once in blue, then the shadow layer twice, in olive green and then in dark green. I inked all three layers with Peeled Paint Distress Ink and off set the dark green shadow layer just slightly from the olive green shadow layer. This cut also has flowers with it but instead of using those I added Prima flowers clustered and layered. And those little leaves you see peeking out from behind the flowers, those are a green "got flowers" style 5 petal flower that I cut into sections to use as tiny leaves. I wished I had taken a photo to better explain, but basically you cut it into 5 pieces at the natural separation down to the middle and each one looks like a little heart when it's cut apart.

My little "free bird" is a Tattered Angels glimmer chip. I inked it along his belly and tail feathers area with some Denim Jean Distress Ink and then sprayed it all over with Glimmer mist. The inking really brings out the embossing on the glimmer chips. I added a tiny black adhesive pearl for an eye and called him done!
Overall, I didn't do much on this page but that's because I'm saving room for a photo.
Who knows, maybe I'll even get this entire album finished this year?!

Wednesday, December 29, 2010

Making Time for Crafts

Hi all! I'm enjoying a nice break from the regular day to day life stuff. My hubby has some time off work so he's sharing the "home" duties. That has given me a chance to get in my studio and play with some items I've had on hand, but haven't gotten around to using yet.
I was chatting with the girls during last nights Live with Prima class and Tim Holtz Rock Candy Crackle paint came up in the topic. I had bought a jar of it some time ago but never tried it out and really wasn't sure what to do with it. Well Cari and the other ladies said I really must give it a try so I promised that I would play with it today.
So I decided to start a mini album just so I could use the product. This is the cover of the album. I used some of my most favorite (and hoarded) Prima products on here. The paper is from the Pastiche collection- it's called Quirky. The flowers are Prima mini roses and fairy tale roses (which started out white and I colored them to match my project) and a Prima Lilliput rose (in yellow, but looks more like a cream). I also used some rose leaves as a foundation for the flowers. The lace trim across the bottom is from Prima too. It is also a creamy white and I colored it with antique linen and tea dye distress inks to get the desired color for my page. The magnifying glass is a Tattered Angels nature glimmer chip.It has an embossed design on it and I sprayed it with glimmer mist for color and shine.

For the "glass" of the magnifying glass, I used the rock candy crackle paint and then when it cracked and dried, I rubbed some broken china distress ink into the cracks for more definition.

I'm not sure what this mini album is going to be for yet, but I think it's off to a lovely start.
I hope I've convinced you to use some of those cherished supplies you've been hoarding and turn them into something even more beautiful.

Wednesday, December 1, 2010

Christmas Cookies (take two)

Yesterday I posted this layout on the YMH Designs blog and the photo was just horrible. Well, I'm back with more (and better) photos.

Here is my two page layout using 2 Sketchy Thursdays sketches.

On this page you can kinda see the glimmery sparkle of the Tattered Angels New limited edition Santa Baby glimmer mist. We have several of the new winter colors in stock at Your Memories Here. I sprayed it on the solid red background paper of both pages.

I also used the same patterned paper on both pages to to keep them similar while using two different layouts for each page. This page is based on this weeks current Sketchy Thursdays challenge.

I just love the little cookie cutter embellies that I found, they are so perfect for these pages.

The title letters on the banner (and Cookies on the opposite page) are velvety flocked stickers. The beautiful green Prima lace trim has a nice Christmas feel to it. And the bright cheery colors are perfect for the fun photos and activity.
I know I say it all the time, but these sketches really help me get caught up on my scrapbook pages. It seems like the only time I'm creating layouts for my own personal use, is when I'm participating in one of these challenges! These photos are from 2008, so it looks like I have a lot more catching up to do!