Here's my very first video! I hope to make more. I've already learned a few things from making this one ;)
The Pebbles stencils, chalk and Prima flowers can all be found in my store.

I have been a Disney addict for many years. I want share how there's a little bit of Disney in my everyday life and I will also share my BIG Disney side, my Disney World trips and my planning tips.
Monday, January 18, 2010
Friday, January 15, 2010
Just Us
Here's a page I made using this week's Sketchy Thursdays sketch:

The layout is of me and my hubby (Kevin). It's been a looooong time since I scrapped a page about just us. Like 5 years long! I'm always making pages about the kids or our family so I though one of just us was over due.
Here's a little background info about me and my husband: We're Parrot Heads (for those of you who don't know what that means, we LOVE Jimmy Buffett) We got married on the beach in Florida and had our wedding reception at Margaritaville, we've got all of Jimmy's CDs (and a couple of albums) We've been to several concerts, in fact Kevin has been to over 20!
So this layout is the two of us at the Buffett concert last June. As you can see by the photo we were having a really good time :)

I used a Chatterbox wood frame to "capture" my ticket stub (I just love using memorabilia on my pages when I can) the frame is decorated with a couple of Prima Flowers and dew drops for the flower's centers. There are a couple more Prima flowers on the page and some golden berry dew drops here and there in the corners for accents. I used my Cricut machine and SCAL software to cut out the background shape and title. I added lime green stickles to the tilte for some extra shine. The background paper is from the DCWV Stack 6.
I never thought of myself as a "sketch user" I always wanted my pages to be my original ideas. Then I realized that sketches are a really just a tool to help get you started. You don't have to follow them exactly and a little inspiration here and there never hurt :)I hope you'll feel inspired today to do a little crafting.
Sunday, January 10, 2010
The Basement Project
Oh how I wish I had taken "before" pictures of our basement when we first moved in. Let's see if I can describe it for you; new and bare, block walls, cement floor, open joist ceiling, a furnace unit dead center of it all. That pretty much describes it. I do have some photos of it "in progress" but I'm not going to post those till it's all done. Except for the one I'm posting today because my Mom wants to see what the new floor looks like. Even though the floor is not completely done (as you can tell by the tools and what not all over the place) there is only about a 5 foot wide strip along the far wall left to go in.
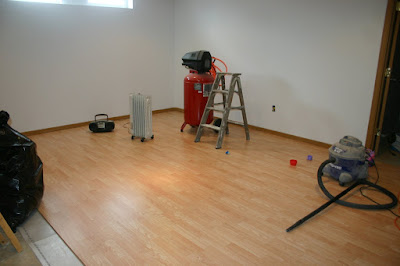
More to come as the project progresses. By the way, it may be a while. We've only been working on this for the last 2 1/2 years :)

More to come as the project progresses. By the way, it may be a while. We've only been working on this for the last 2 1/2 years :)
Saturday, January 9, 2010
Homemade Glimmer Mist
Whoops, forgot to tell you all how I made my own Glimmer mist. First I MUST say, this was not my original idea. I read it on Pezzadoodles blog.
It's pretty simple you just put some water into a little spray bottle (don't fill it too full, you need room to shake it) then add a tiny scoop (less than 1/2 tsp.) of perfect pearls powder. Then shake it up. Tah Dah! that's it. If you want it to be colored you can add some dye to it, but I like mine to just be shimmery and let the color of the paper show through.
It's pretty simple you just put some water into a little spray bottle (don't fill it too full, you need room to shake it) then add a tiny scoop (less than 1/2 tsp.) of perfect pearls powder. Then shake it up. Tah Dah! that's it. If you want it to be colored you can add some dye to it, but I like mine to just be shimmery and let the color of the paper show through.
Wednesday, January 6, 2010
Too Much Purple?

I think I may have gotten a little out of control with the purple on this card. It started with the background, a piece of card stock I had been playing around with testing out my homemade glimmer mist. I embossed it with my Cuttlebug D'vine swirls folder. Then I had some extra top notes cut from the winter album I had just made earlier this week. I embossed those too, this time with the Swiss Dots Cuttlebug folder. I stamped the smaller one on the reverse side and then clear embossed it (I just love the way it makes it look "slick")

I layered it on the other one with some pop dots for more dimension. The purple swirly ribbon was from my stash and I thought it complemented the swirl embossed background.

The ribbon bow is made up of a few fibers and ribbons gathered together. I made the hat pin/stick pin (whatever you call 'em) a while ago and have been dying to use one somewhere on a project :)
Monday, January 4, 2010
Winter Mini Album
I made this shape album out of chipboard that I cut on my Cricut (with the deep cut blade and housing) and then covered with some non-traditional colored Christmas patterned paper. It is just under 6"x6" so that I could get 4 cuts out of one sheet of 12"x12" paper. I have the scut file for it to share with you too.
I used my Bind-it-All to bind it and then decorated the wires with various ribbons.

The cover isn't finished yet, cuz I'm not sure what I want to put on it.

I used my Cricut for all the cuts, some are from cartridges (the snowflakes are from "when it's cold outside winter mini 09) and some are from SCAL. I glittered up the snowflake with stickles and stamped the snowflakes on the photo mat with the Imaginsce "believe" stamp (there's a snow flake in the set) There's also a lot of stickles on the second page.

The snowflake on this page is also from the winter mini cartridge and the mat is SCAL which I embossed with the Cuttlebug D'vine swirls folder. That cute little snow man is from the Doodle Charms cartridge and I added a little bit of frosted stickles to him to make him look a little shimmery.

The ornament adorning this photo mat is from the Christmas Cheer cartridge that I cut first with black out (patterned paper) then in shadow. The photo mat on the opposite page is a Sizzix frame (I can't believe I still have a use for those!)

More SCAL cuts on these pages along with a tree cut from the Christmas Cheer cartridge using the rounded square feature. I blinged up both pages with some adhesive pearls and stickles.

More SCAL cuts again on this page and on the opposite page I embossed the photo mat with the Cuttlebug Swiss dots folder, then I rubbed a little ink over top the dot to bring them out more. The "jingle all the way" is a stamp and I added some silver embossing powder to the bells. The pink frame was a gift (I got a whole set of them from a friend, thanks Steph)
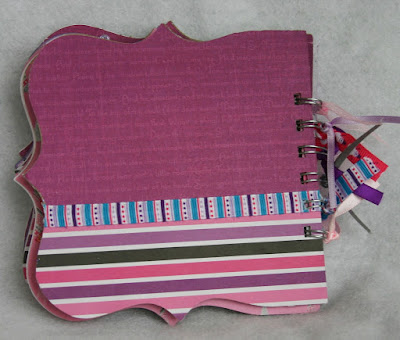
The back cover, nothing exciting here. Just some patterned paper and a ribbon strip.
Here's that scut file for the album I promised you.
I hope you head over to the YMH Designs blog to play along with our current contest. The theme is anything winter as long as it's in the form of a scrapbook page
Saturday, January 2, 2010
New Contest Over at YMH Designs
I've decided to add a little fun to the Your Memories Here Designs blog. A monthly contest! I want you to share your memories with us and for doing so, the opportunity to win a prize! Visit the YMH Designs blog for all the details. I hope you'll come play along.
Subscribe to:
Comments (Atom)