Tuesday, August 9, 2011

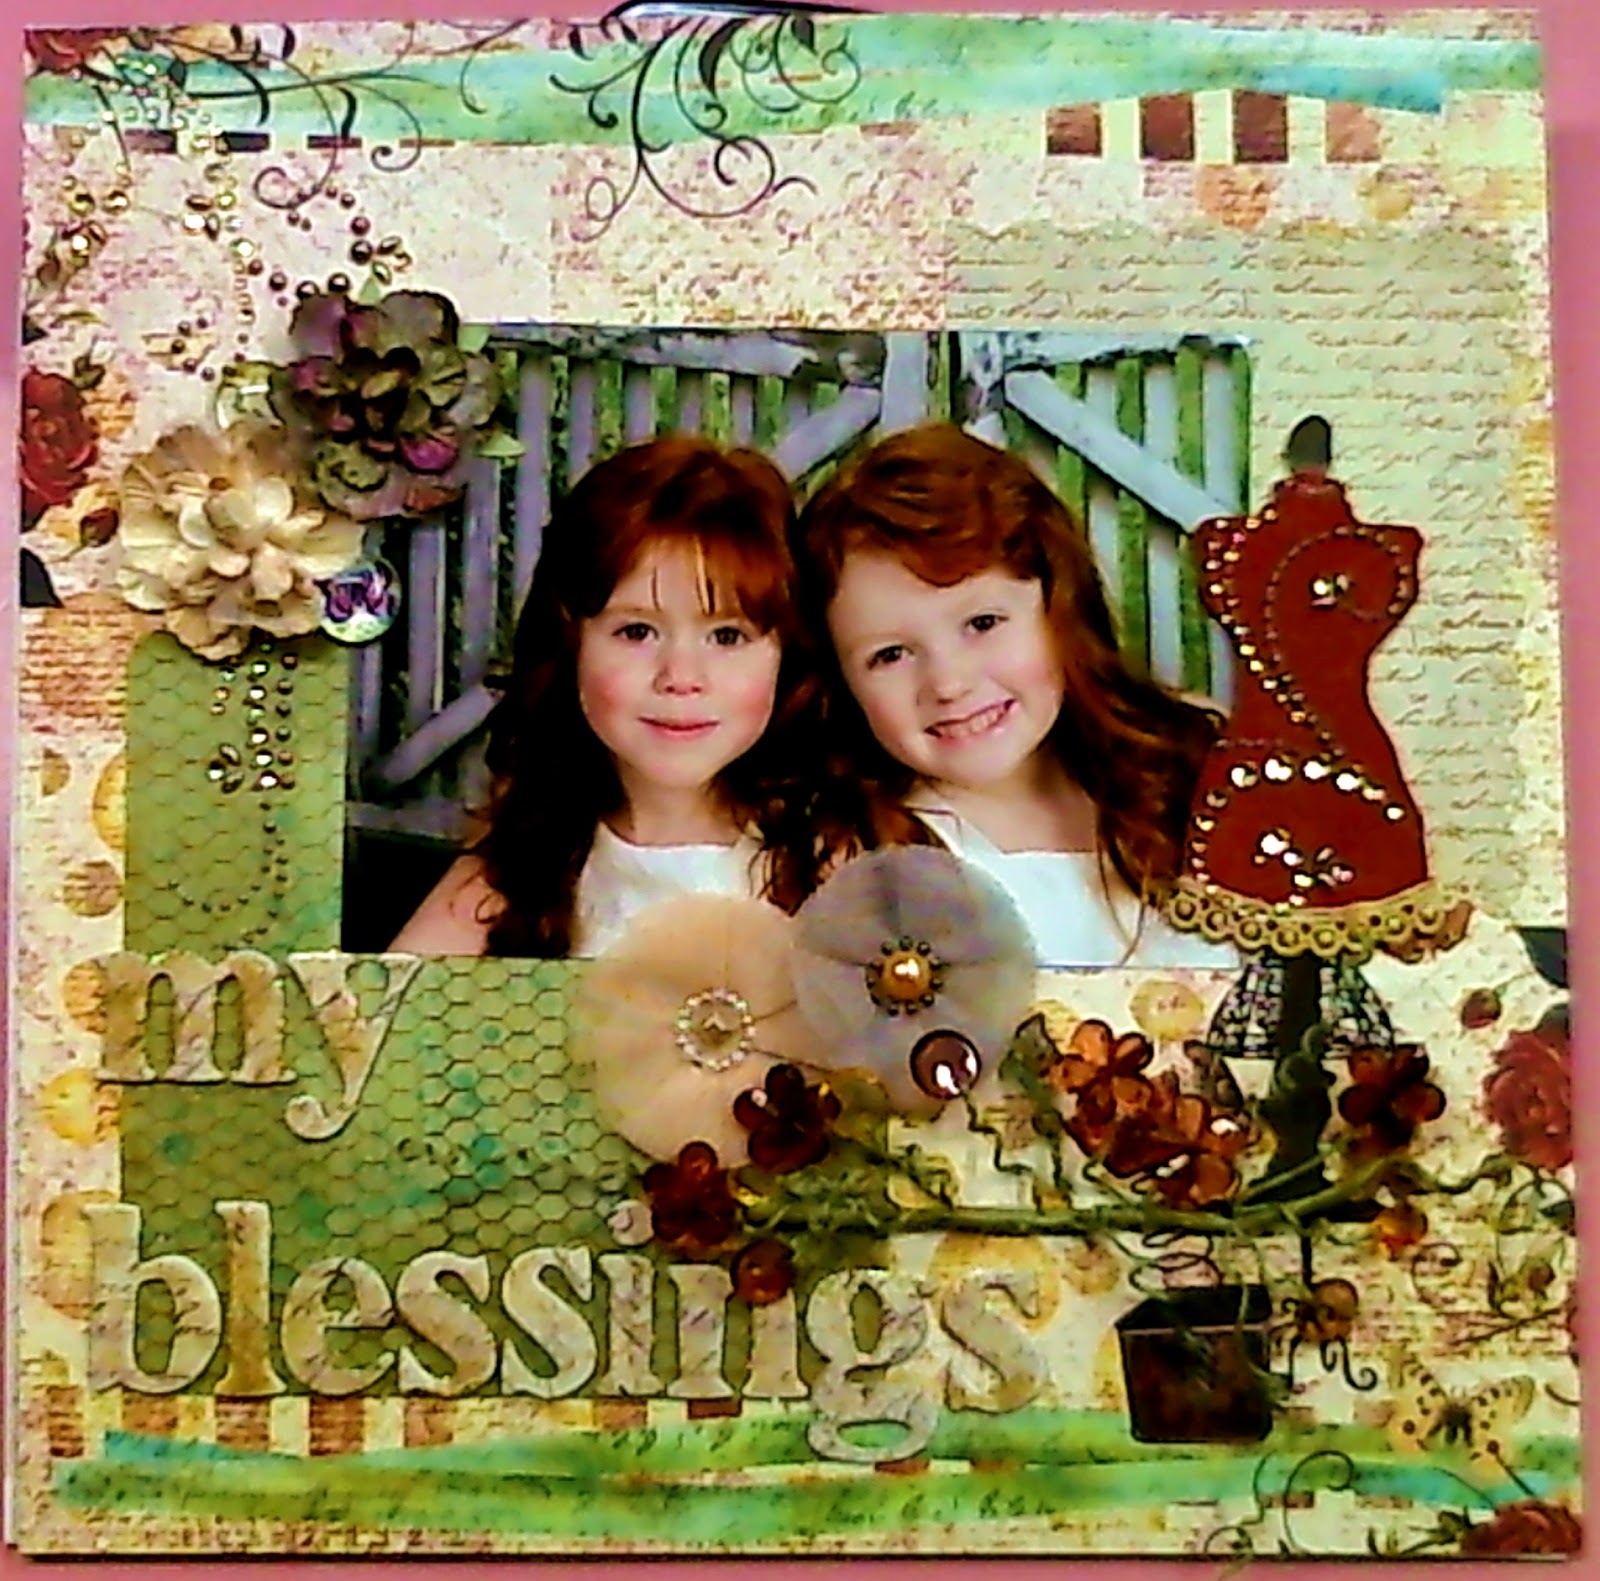
My Blessings

Whoa, here I am posting a project, I know it's been a while. I really have been making things the truth is I just hate uploading photos from my camera to my computer, then editing and then adding to the blog...
For this post I was able to cheat a little and use my webcam to take the pictures (of my project in progress) and they are automatically uploaded to my photo file so it's a lot less hassle. I know you're thinking "how lazy can she be?" I really am THAT lazy!
Now on to my layout...
(clicking on the photos will make them larger/easier to view)
I used Prima's August build-a-page sketch for my starting point (if you go check out the sketch on Prima's blog you'll see I didn't follow it very closely) The back ground paper is from the Prima Pastche collection and this sheet here is "heart strings". The other papers that my photo is placed upon are also Prima, from the 6x6 inch Backstage paper pad. I chose relatively plain/monochromatic pages from that pad so that I could stamp on them with a couple of my large background stamps (one is a script, the other is from Prima called Hexagon - but I call it chicken wire :) ) I used Saddle Brown Staz-on ink  so that I could use my glimmer mist and glimmer glams over top of the designs and they won't run or smear.
For my page title I used a Prima chipboard font and I painted the letters I needed with "Hayride" Glimmer Glam. I find it easier to paint them while still on the sheet - they stay put and I don't lose any letters before I get them stuck down (don't you hate it when you are trying  to position your letters and one comes up missing, usually one that you didn't have an extra one to begin with?)
So I placed my title on the page using Helmar 450 quick dry. Yes, those alphas are self adhesive, but I don't want them falling off later on down the road. With Helmar backing up the adhesion I know those suckers are there for good!
Next I added the bling. A dress form shape cut out of chipboard with the "body" of it covered in linen fabric that I colored using Santa Baby Glimmer Mist. I dressed it up with some Prima Pearls and Crystals swirls and a little piece of Prima lace trim that I colored with the Hayride Glam. I also glued all that down with the Helmar 450 quick dry - it really is the all-in-one glue. I also added a couple of Prima flowers to the bottom of my daughters' photo.
Lastly, I finished it up with a couple more Prima flowers, a beautiful Prima vine and a couple of Pastiche pebbles that I tucked in beside the flowers on the upper left corner of the photo. All adhered down with - you guessed it Helmar 450.
I also wanted to mention that all the crystal and pearl swirls on this layout came from one package, I just cut them apart to make them go a little further ;)
I get nearly all of my supplies at www.YourMemoriesHere.com because I really like the owner :)
I hope you'll take the time to count some of your blessings today.
HUGS,


Tuesday, June 7, 2011

Birthday Card for GG

Hi All! Feels like I've been away forever (OK well, at least the month of May) So much to do and so little time, I'm afraid my crafting suffers the most from it.
Well, last Friday was my grandma's birthday ( I won't say how old she is but if you saw her, you wouldn't believe me anyway) So I just HAD to make her a special birthday card. I was reading my sweet and incredibly talented friend, Karli's blog where she made this card and said it was so easy! I thought 'really? easy? OK I gotta try it.' You know what? She was right! Now some of you are probably thinking, "duh I knew that already Krissy, I've made tons" Well, I've always been too lazy to try because I though it must be a lot of work. I was SO WRONG. So if you've never given these tri-fold shutter cards a try, please do. You'll be thanking me just like I'm thanking Karli now!

*Disclaimer: I must apologize for the poor quality of the photos and the distracting backgrounds (I tried to edit the best I could) but I had taken these photos at my Mom's house, with my cell phone, right before we left to go to my Grandma's*


The details: This card is ALL Prima!
I used the Sparkling Spring 6x6 paper pad for the patterned papers, the flowers are assorted Prima's the lace trim is Prima Alencon and I even cut it apart to use the individual flowers as centers for the hydrangeas! There are also a couple of Vintage Trinkets on there.

Wanna know a little secrete? I decorated this entire card while driving from central Ohio to Pittsburgh PA!
Here's the proof:

Yep, that's Helmar 450 Quick Dry you see sitting in my cup holder!

So go try something new today!
HUGS

Tuesday, May 10, 2011

Back from Vacation

Hey everyone, I'm back from my trip but still can't get into the swing of things. Is it possible to have jet lag if you've only flown from Florida to Ohio?
While at Disney World we went to Epcot, which was holding their annual Flower and Garden festival and WOW how beautiful it is. All the different plants, flowers and topiaries. It was a treat for the eyes and the nose :) It also gave lots of inspiration for some projects using Prima flowers. While the Epcot Flower and Garden festival will come to an end soon this month, the beauty of Prima's flowers will last forever (and you gotta love that!)
So I'm sharing with you some of my family's vacation pictures until I can get my butt in gear and make a project.


Tuesday, April 19, 2011

Ladybug Love

Hello and Happy Tuesday everyone! It's a soggy day here, perfect for staying in and working on something crafty.
Today I wanted to share with you a lamp shade that I made for my daughter's bed room. Do you remember Lilee's Ladybug room?
Well she needed a new lamp shade to match because her old one had farm animals on it :)
So I bought a plain white shade and dressed it up using red with black polka dot ribbon.

I glued the strips of the ribbon using Helmar 450 quick dry, covering the entire shade in ribbon.
Then I took a white Prima flower and sprayed it with Dazzling Diamonds Glimmer Mist and glued it along with a Prima leaf to the lamp shade.
I finished it off with a yellow button center that I glammed up with some yellow Stickles and a cute ladybug button.

Lilee just loves it and that makes me happy! I love when I can make things for my kids and they appreciate it. I know someday they are going to prefer "store bought" like all their friends have, so I'll enjoy them wanting 'Mom to make it' for as long as I can :)

Wednesday, April 6, 2011

Addicted to Mists

Hi everyone, my name is Kristina and I'm addicted to Glimmer Mists.
Did you see the canvas back pack I made on my Ustream show (either LIVE or the recording)? This one here:

Well, now I'm misting everything! I made two more little canvas bags for our upcoming Florida vacation. I'm thinking the girl's can use them to tote around their beach findings.

On this one I used Teal High Heal, Trunk Bay, and Hula Hoop glimmer mists. I used the sea horse Glimmer Screen from the "Under the Sea" set. First I sprayed the center of the bag with the light green Hula Hoop and then laid the sea horse stencil on top and sprayed with the Trunk Bay. I let it dry a bit and then I created a mask out of chipboard by tracing around the outside of the seahorse stencil and cutting it out. I placed that over top of my seahorse image on the bag and sprayed the whole thing with the Teal High Heal chalk mist.
When my bag was all dry I used some Prima Alencon lace and glued it around the top of my bag (you could sew it, but who has that kind of time?)
Can you see that gorgeous sparkle of the glimmer mist?
Well then I was on a roll and had to make another.

So on this bag I used the sand dollar Glimmer Screen and followed the same process as above except I placed the screen on the raw canvas first, then misted with Sun Sisters (which is such a beautiful warm yellow) then created my chipboard mask, as I had done with the sea horse bag and then sprayed all over with Alaskan Salmon chalk mist.

I made this canvas flower using the same method as those seen during my Ustream, by cutting the canvas out on my Cuttlebug with the Tim Holtz Tattered Florals die and misted them with the Sun Sisters and Alaskan Salmon. I finished it off with a Prima gemstone center. This flower is pinned to my bag so that I can remove it if I want to.

I can almost hear the waves crashing in the background ;)
If you're feeling like creating a tropical getaway bag, grab some Glimmer Screens and some Glimmer mists and get spraying! All Tattered Angels products are on sale at Your Memories Here for a super, unbelievably low price this month (or while supplies last)


Tuesday, March 8, 2011

Perfectly Pink!

Hi everyone! Happy Tuesday (Mardi Gras as a mater of fact) I have a really fun projectto share with you, but first the winner of my blog candy for Jenn's Birthday blog hop.
The winner is Katieo! I have contacted her and if she doesn't respond then we'll pick another winner next Tuesday OK?
Now on with the project:

My project today features a Live with Prima kit designed by Lolly Chessie. She made hers in a totally awesome teal for the Live with Prima class on December 30th and here I am over 2 months later finally making my version...in PINK!

Just a reminder, here is Lolly's terrifically teal version and here is the link to her recorded Live with Prima class showing you how she made it.

What I did differently with mine (besides the obvious pink color) is I painted my wood box white.
So here is what the box looks like, full of velvet Prima flowers:

First, you take all the flowers out and save them for another use :)

Then you take the wooden grid inside out. Now, it's glued in just a little bit so it takes a little gentle persuasion to pop it out but don't worry, it will come out.

Next, I painted all the edges white. Not a heavy coat, just enough to lighten it up. Of course you could paint yours whatever color you like or omit the paint and leave it wood.

I didn't paint the bottom of the inside because you're going to glue the patterned paper in there.

I cut my Prima patterned paper to fit the inside of the box and then for some extra pizazz I sprayed it with Dazzling Diamonds Glimmer Mist and I stamped a script background in red ink.
Following Lolly's directions, I cut the remainder of my pattered paper to the shape of the felt boarder and glued it to the glass lid of my box.
And finally I made the flowers as Lolly showed in her class and decorated the outside (and a little of the inside too) with the flowers from this kit.

Your Memories Here has these kits available in both pink and teal. They include all the Prima products you need to make one of these boxes (or a version of your own) plus have lots of other flowers left over!
Just remember the Live with Prima classes are FREE and recorded (click here to visit the class archives) so you can go back and watch them whenever you have the time. It's never too late to try out one of these projects!

I hope you have a great day! I'll be back on Friday for the weekly steal.

Tuesday, February 15, 2011

Custom T Shirts - You Can Do It!

Hey everyone! It's another quick, last minute Tuesday post for me. This project took only 10 minutes to complete - seriously!
I wanted to share with you a couple of T Shirts I made for my girls using my Cricut machine.

How do you use a Cricut to make T Shirts (I know you're thinking)? Well, I used one of the great images from the Wall Decor cartridge, the crown, and cut it out of a piece of freezer paper, yep that stuff you buy in the grocery store next to the aluminum foil and wax paper.
That becomes your stencil. Then you simply iron it onto your shirt - shiny side down and it adheres itself into place (but only temporarily) Using your favorite fabric paint or as I used fabric glue and glitter (Tulip Brand - made to be machine washed) apply it to your design. When you're done, just peel up the paper and voila! A custom T shirt.
Here are my lovely assistant's modeling their new fashions:

We still have some Cricut products left in stock at Your Memories Here, but they are clearance priced and once they are gone that's it!