Showing posts with label projects. Show all posts

Thursday, February 9, 2012

Homemade Shelf

I've had this project in mind for a while and with the help of my husband, Kevin my idea came to life.
I wanted it to be rustic looking, but still match the colors of my decor.Thank goodness Kevin is handy with woodworking and willing to build whatever is in my head :)
He used cedar siding, that still has a rough sawn texture and we left it unfinished so it would continue to age.
I got the hangers/hooks at Hobby Lobby. Kevin cut out the rectangles for my letters from 1" thick MDF and I painted them a chocolate brown. Then using my Cricut and the Plantin Schoolbook cartridge I cut each letter in shadow then regular using the patterned cardstock. I also inked the edged of all my papers with Vintage Photo distress ink to give it a further aged look. I adhered the letters to the blocks of MDF with mod podge. I applied 3 coats total (letting it dry completely between each coat). Then I inked the edges of the blocks with Staz-on saddle brown (because that won't smear off of the slick mod podged surface)
The shelf/rack has already become very useful. The girls hang their coats and back packs on it when they come home and I always know where my purse is now :)

Tuesday, April 19, 2011

Ladybug Love

Hello and Happy Tuesday everyone! It's a soggy day here, perfect for staying in and working on something crafty.
Today I wanted to share with you a lamp shade that I made for my daughter's bed room. Do you remember Lilee's Ladybug room?
Well she needed a new lamp shade to match because her old one had farm animals on it :)
So I bought a plain white shade and dressed it up using red with black polka dot ribbon.

I glued the strips of the ribbon using Helmar 450 quick dry, covering the entire shade in ribbon.
Then I took a white Prima flower and sprayed it with Dazzling Diamonds Glimmer Mist and glued it along with a Prima leaf to the lamp shade.
I finished it off with a yellow button center that I glammed up with some yellow Stickles and a cute ladybug button.

Lilee just loves it and that makes me happy! I love when I can make things for my kids and they appreciate it. I know someday they are going to prefer "store bought" like all their friends have, so I'll enjoy them wanting 'Mom to make it' for as long as I can :)

Wednesday, April 6, 2011

Addicted to Mists

Hi everyone, my name is Kristina and I'm addicted to Glimmer Mists.
Did you see the canvas back pack I made on my Ustream show (either LIVE or the recording)? This one here:

Well, now I'm misting everything! I made two more little canvas bags for our upcoming Florida vacation. I'm thinking the girl's can use them to tote around their beach findings.

On this one I used Teal High Heal, Trunk Bay, and Hula Hoop glimmer mists. I used the sea horse Glimmer Screen from the "Under the Sea" set. First I sprayed the center of the bag with the light green Hula Hoop and then laid the sea horse stencil on top and sprayed with the Trunk Bay. I let it dry a bit and then I created a mask out of chipboard by tracing around the outside of the seahorse stencil and cutting it out. I placed that over top of my seahorse image on the bag and sprayed the whole thing with the Teal High Heal chalk mist.
When my bag was all dry I used some Prima Alencon lace and glued it around the top of my bag (you could sew it, but who has that kind of time?)
Can you see that gorgeous sparkle of the glimmer mist?
Well then I was on a roll and had to make another.

So on this bag I used the sand dollar Glimmer Screen and followed the same process as above except I placed the screen on the raw canvas first, then misted with Sun Sisters (which is such a beautiful warm yellow) then created my chipboard mask, as I had done with the sea horse bag and then sprayed all over with Alaskan Salmon chalk mist.

I made this canvas flower using the same method as those seen during my Ustream, by cutting the canvas out on my Cuttlebug with the Tim Holtz Tattered Florals die and misted them with the Sun Sisters and Alaskan Salmon. I finished it off with a Prima gemstone center. This flower is pinned to my bag so that I can remove it if I want to.

I can almost hear the waves crashing in the background ;)
If you're feeling like creating a tropical getaway bag, grab some Glimmer Screens and some Glimmer mists and get spraying! All Tattered Angels products are on sale at Your Memories Here for a super, unbelievably low price this month (or while supplies last)


Tuesday, March 8, 2011

Perfectly Pink!

Hi everyone! Happy Tuesday (Mardi Gras as a mater of fact) I have a really fun projectto share with you, but first the winner of my blog candy for Jenn's Birthday blog hop.
The winner is Katieo! I have contacted her and if she doesn't respond then we'll pick another winner next Tuesday OK?
Now on with the project:

My project today features a Live with Prima kit designed by Lolly Chessie. She made hers in a totally awesome teal for the Live with Prima class on December 30th and here I am over 2 months later finally making my version...in PINK!

Just a reminder, here is Lolly's terrifically teal version and here is the link to her recorded Live with Prima class showing you how she made it.

What I did differently with mine (besides the obvious pink color) is I painted my wood box white.
So here is what the box looks like, full of velvet Prima flowers:

First, you take all the flowers out and save them for another use :)

Then you take the wooden grid inside out. Now, it's glued in just a little bit so it takes a little gentle persuasion to pop it out but don't worry, it will come out.

Next, I painted all the edges white. Not a heavy coat, just enough to lighten it up. Of course you could paint yours whatever color you like or omit the paint and leave it wood.

I didn't paint the bottom of the inside because you're going to glue the patterned paper in there.

I cut my Prima patterned paper to fit the inside of the box and then for some extra pizazz I sprayed it with Dazzling Diamonds Glimmer Mist and I stamped a script background in red ink.
Following Lolly's directions, I cut the remainder of my pattered paper to the shape of the felt boarder and glued it to the glass lid of my box.
And finally I made the flowers as Lolly showed in her class and decorated the outside (and a little of the inside too) with the flowers from this kit.

Your Memories Here has these kits available in both pink and teal. They include all the Prima products you need to make one of these boxes (or a version of your own) plus have lots of other flowers left over!
Just remember the Live with Prima classes are FREE and recorded (click here to visit the class archives) so you can go back and watch them whenever you have the time. It's never too late to try out one of these projects!

I hope you have a great day! I'll be back on Friday for the weekly steal.

Tuesday, February 1, 2011

Gotta Love Glitter

I've been working on my mini album and have a couple more pages to share with you.
I got a little out of control with the embellishments and it's looking like it's going to be pretty thick, Oh well!

I've used some more of the DCWV Mariposa papers as my backgrounds.

On this page I used a Prima butterfly as my main embellishment, I thought the orange went nicely with the coppery glitter on the paper. I also added the word "dream" that I cut on my Cricut and then sprayed with Sugar Maple Glimmer Mist (I think that is my favorite color of GM right now) I inked all the edges of the page with spiced marmalade distress ink.

On this page I added a side pocket by edging some of the patterned paper with my Alterations On the Edge die (pst... it's a Sizzix die, but I totally use it in my Cuttlebug) and then adhering it to the edge of my page. The little leafy branch was also cut on my Cricut and then I hot glued some Prima mini roses in Sunrise Yellow. The larger flower is a Prima Lilliput rose that was all yellow, but I sprayed the center with some Pomegranate Glimmer Mist for a bit of contrast.

I'm almost finished with this mini and I can't wait to show it to you assembled with all my photos inside.

Tuesday, January 25, 2011

Recycling Can Be Pretty

Well silly me, I posted this today over on the YMH Designs blog but forgot to post over here:) So I'm just a few hours late. Oh well, better late then never!
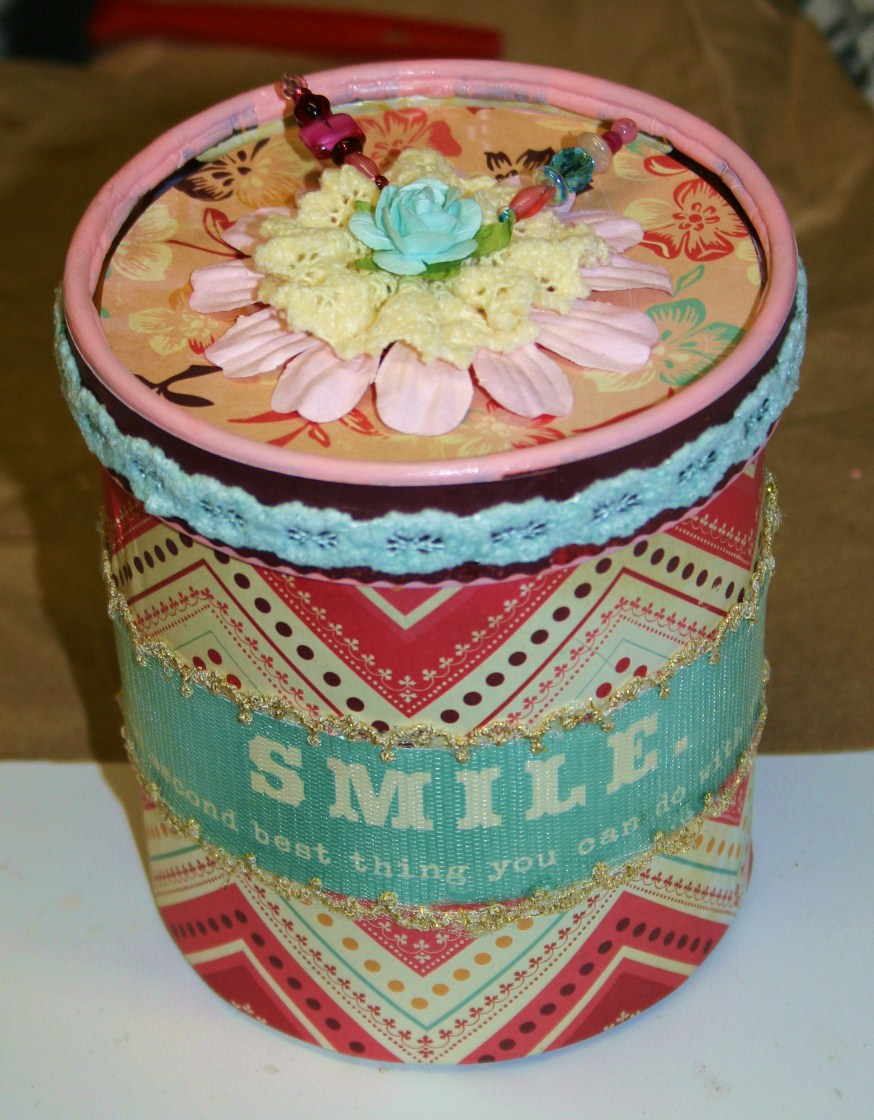
Today's project requires you to eat an entire carton of ice cream. Do you think you can do that? If your answer is undoubtedly YES! Then you're my kind of crafter :)

First I took said ice cream container and washed it out real good (we don't need to attract any bugs) Then I let it sit on my counter for about a week so my kids could ask me at least 3 times a day "Mom, can I have that ice cream?" and I would answer "no, it's empty" but still they asked every single day. So to end their torture, I finally came up with a plan as to what I was going to do with this container.
*little background story*
A couple of weeks ago the very crafty LollyChops made THESE and I was so inspired by her class that I wanted to make one too. But I keep putting off finishing up that box of cheese (and yes, I know I can wrap it up in plastic and steal the box) but this carton of ice cream came available much quicker ;)
So, an assortment of Cosmo Cricket "Hey Sugar" papers and paper embellies arrived at YMH this weekend and I was in love. Inspiration was born!

Measure your container (mine was 5" tall by 16" around) so I cut my Cosmo Cricket " Be Mine" paper 5"x12" and then pieced in another small piece of paper 5" x 6" to overlap.

I slathered up the sides with Mod Podge and wrapped the paper around. I used clothes pins (as a second set of hands) and rubber bands to hold it in place while the glue dried.

I painted the lid with several coats of pink acrylic craft paint.* At first I didn't think the paint was going to stick because of the shiny finish of the carton but after the first coat dried the rest went on with no problem.

Then I cut a strip of my patterned paper (this is the same paper as the body of the carton, just the reverse side!) I also glued it with Mod Podge and banded it till it was dry.

I kinda skipped ahead with the photos so let me catch you up:
Next I used the "strip tease" card stock with the various funny sayings and patterns on it and selected the one that says "Smile, it's the second best thing you can do with your lips." I used it to make a belly band to go around my carton (and had to piece another bit of paper to fill the gap - remember our circumference is 16" and our paper is only 12") I glued that on with my ATG gun. Then I used my Webster's Pages trims to make a soft aqua band around the lid and the sheer net trim around the belly band ( I used hot glue to attach both of those).

For the lid I cut a 4 1/2" circle out of the "Honey, Honey" paper and glued it in place. Then I added a large, pink Prima flower and gathered some Prima trim into a flower shape and hot glued that down on top of the pink flower and lastly glued an aqua Prima Fairytale rose on the top of that.

I whipped up a couple of beaded hat pins to stick in my flower stack for a little touch of "bling".

For this entire project I used 1 whole sheet of 12"x12" paper, a small strip of the "strip tease" paper and a circle from another sheet (which I could have gotten out of the fist piece of card stock, but I wanted a contrasting paper) So that leaves 10 and 3/4 sheets of card stock plus all the other embellies in the kit for many more projects! This $10 kit goes a looooong way!

This little cute doesn't have a designated purpose yet but since nothing about those papers say that it's for Valentine's day, I'm thinking I can use it for whatever I want!


Tuesday, January 18, 2011

"Free Bird" for all you Skynyrd fans

Happy Tuesday! Did you all have a long weekend too? My girls didn't have school yesterday for Dr. Martin Luther King's Day so we kinda vegetated all day :)
I did a little more work on my mini album this weekend (it's a slow work in progress) Remember the cover page HERE

The background paper on this page is from the DCWV Mariposa stack. I'm using the 8"x8" stack for this since my mini album is only a 6"x6" so there is minimal waste and the images are more to scale than if I were to use the 12"x12" papers cut down.

The bird cage on my page was cut on my Cricut using the Bloom Lite cartridge. I cut out the first layer once in blue, then the shadow layer twice, in olive green and then in dark green. I inked all three layers with Peeled Paint Distress Ink and off set the dark green shadow layer just slightly from the olive green shadow layer. This cut also has flowers with it but instead of using those I added Prima flowers clustered and layered. And those little leaves you see peeking out from behind the flowers, those are a green "got flowers" style 5 petal flower that I cut into sections to use as tiny leaves. I wished I had taken a photo to better explain, but basically you cut it into 5 pieces at the natural separation down to the middle and each one looks like a little heart when it's cut apart.

My little "free bird" is a Tattered Angels glimmer chip. I inked it along his belly and tail feathers area with some Denim Jean Distress Ink and then sprayed it all over with Glimmer mist. The inking really brings out the embossing on the glimmer chips. I added a tiny black adhesive pearl for an eye and called him done!
Overall, I didn't do much on this page but that's because I'm saving room for a photo.
Who knows, maybe I'll even get this entire album finished this year?!

Wednesday, December 29, 2010

Making Time for Crafts

Hi all! I'm enjoying a nice break from the regular day to day life stuff. My hubby has some time off work so he's sharing the "home" duties. That has given me a chance to get in my studio and play with some items I've had on hand, but haven't gotten around to using yet.
I was chatting with the girls during last nights Live with Prima class and Tim Holtz Rock Candy Crackle paint came up in the topic. I had bought a jar of it some time ago but never tried it out and really wasn't sure what to do with it. Well Cari and the other ladies said I really must give it a try so I promised that I would play with it today.
So I decided to start a mini album just so I could use the product. This is the cover of the album. I used some of my most favorite (and hoarded) Prima products on here. The paper is from the Pastiche collection- it's called Quirky. The flowers are Prima mini roses and fairy tale roses (which started out white and I colored them to match my project) and a Prima Lilliput rose (in yellow, but looks more like a cream). I also used some rose leaves as a foundation for the flowers. The lace trim across the bottom is from Prima too. It is also a creamy white and I colored it with antique linen and tea dye distress inks to get the desired color for my page. The magnifying glass is a Tattered Angels nature glimmer chip.It has an embossed design on it and I sprayed it with glimmer mist for color and shine.

For the "glass" of the magnifying glass, I used the rock candy crackle paint and then when it cracked and dried, I rubbed some broken china distress ink into the cracks for more definition.

I'm not sure what this mini album is going to be for yet, but I think it's off to a lovely start.
I hope I've convinced you to use some of those cherished supplies you've been hoarding and turn them into something even more beautiful.

Tuesday, November 16, 2010

Is It Too Early?

Hey everyone! I have been seeing some really great Christmas decorations, cards and tags lately. I keep telling myself *it's not too early to 'make' Christmas themed items, as long as I don't display them until after Thanksgiving.
So here is my first Christmas themed project for the season:

This is a wall hanging/wreath type decoration. I was inspired by the ornament made by Lolly (she gives an amazing tutorial for it HERE) Lolly's is ornament sized but I made mine slightly larger using 3" squares for the cones and a 5" circle for the center(which I sprayed with Snow Queen glimmer mist, one of the new winter colors) . The completed size of it is about 9". For the entire project I used only 3 sheets of double sided paper, 2 of the "Snow Day" and 1 "Winter Wisp" Both available at Your Memories Here with lots of other fabulous double sided papers.
I used thick chipboard letters to spell out the word "JOY". I painted the edges of each letter with purple acrylic paint first, then glued the patterned paper to the front. I added a coating of Mod Podge to each letter to make sure the paper doesn't lift up. Then I inked all the edges in dusty concord distress ink and added some icicle Stickles around all the edges too for a frosty ice look.

The letter "J" is embellished with some tiny jingle bells strung on light blue fibers, wrapped around the letter. I used a little dab of hot glue to keep each little bell in place.

The letter "O" has a few purple and aqua rhinestones embellishing it.

And finally for the letter "Y" I used some snowflake shaped brads, cut the prongs off then I smooshed (yes, that's a technical term) them into an embossing ink pad to get them well coated and sprinkled them with a light purple (Thistle from American Crafts) embossing powder and heated carefully with my heat gun. I used some hot glue to attach each one.

To attach the letters to my cone wreath base, I used the hot glue again. It seems to be holding up pretty good. Since the letters are made of chipboard they're pretty lightweight.

When it was all finished I proudly showed Kevin and he asked "Is that for someone named Joy?" Gosh he can be such a smart arse sometimes!

I hope to be back later this week with some Fall themed projects that I've been working on in my head :) I just got to get them out and onto paper!


Tuesday, November 2, 2010

Flowers and Butterflies Mini Album

Hi all! Today I have a bright cheery mini album to share with you.
It went together quite quickly because I used coordinating papers from the DCWV Blossoms and Butterflies stack.

The Prima flowers are the perfect embellishment for each page.


I also used my Cuttlebug embossing folders for some of the photo mats and it gives them great texture and visual appeal to the solid colored card stocks.


I misted some of the papers with Glimmer Mists so they have a beautiful shimmer, I only wish the camera could catch all the sparkle on these pages.

Layering different colored and shaped flowers is also a great way to add impact on the pages.

For the centers of the flowers I used rhinestones from the Prima Pearls and Crystals e-line collection (psst... you get 60 in a package for only $1.49)

Visit Your Memories Here for some awesome supplies to get started on your next paper crafting project.