Showing posts with label Layout. Show all posts

Tuesday, August 9, 2011

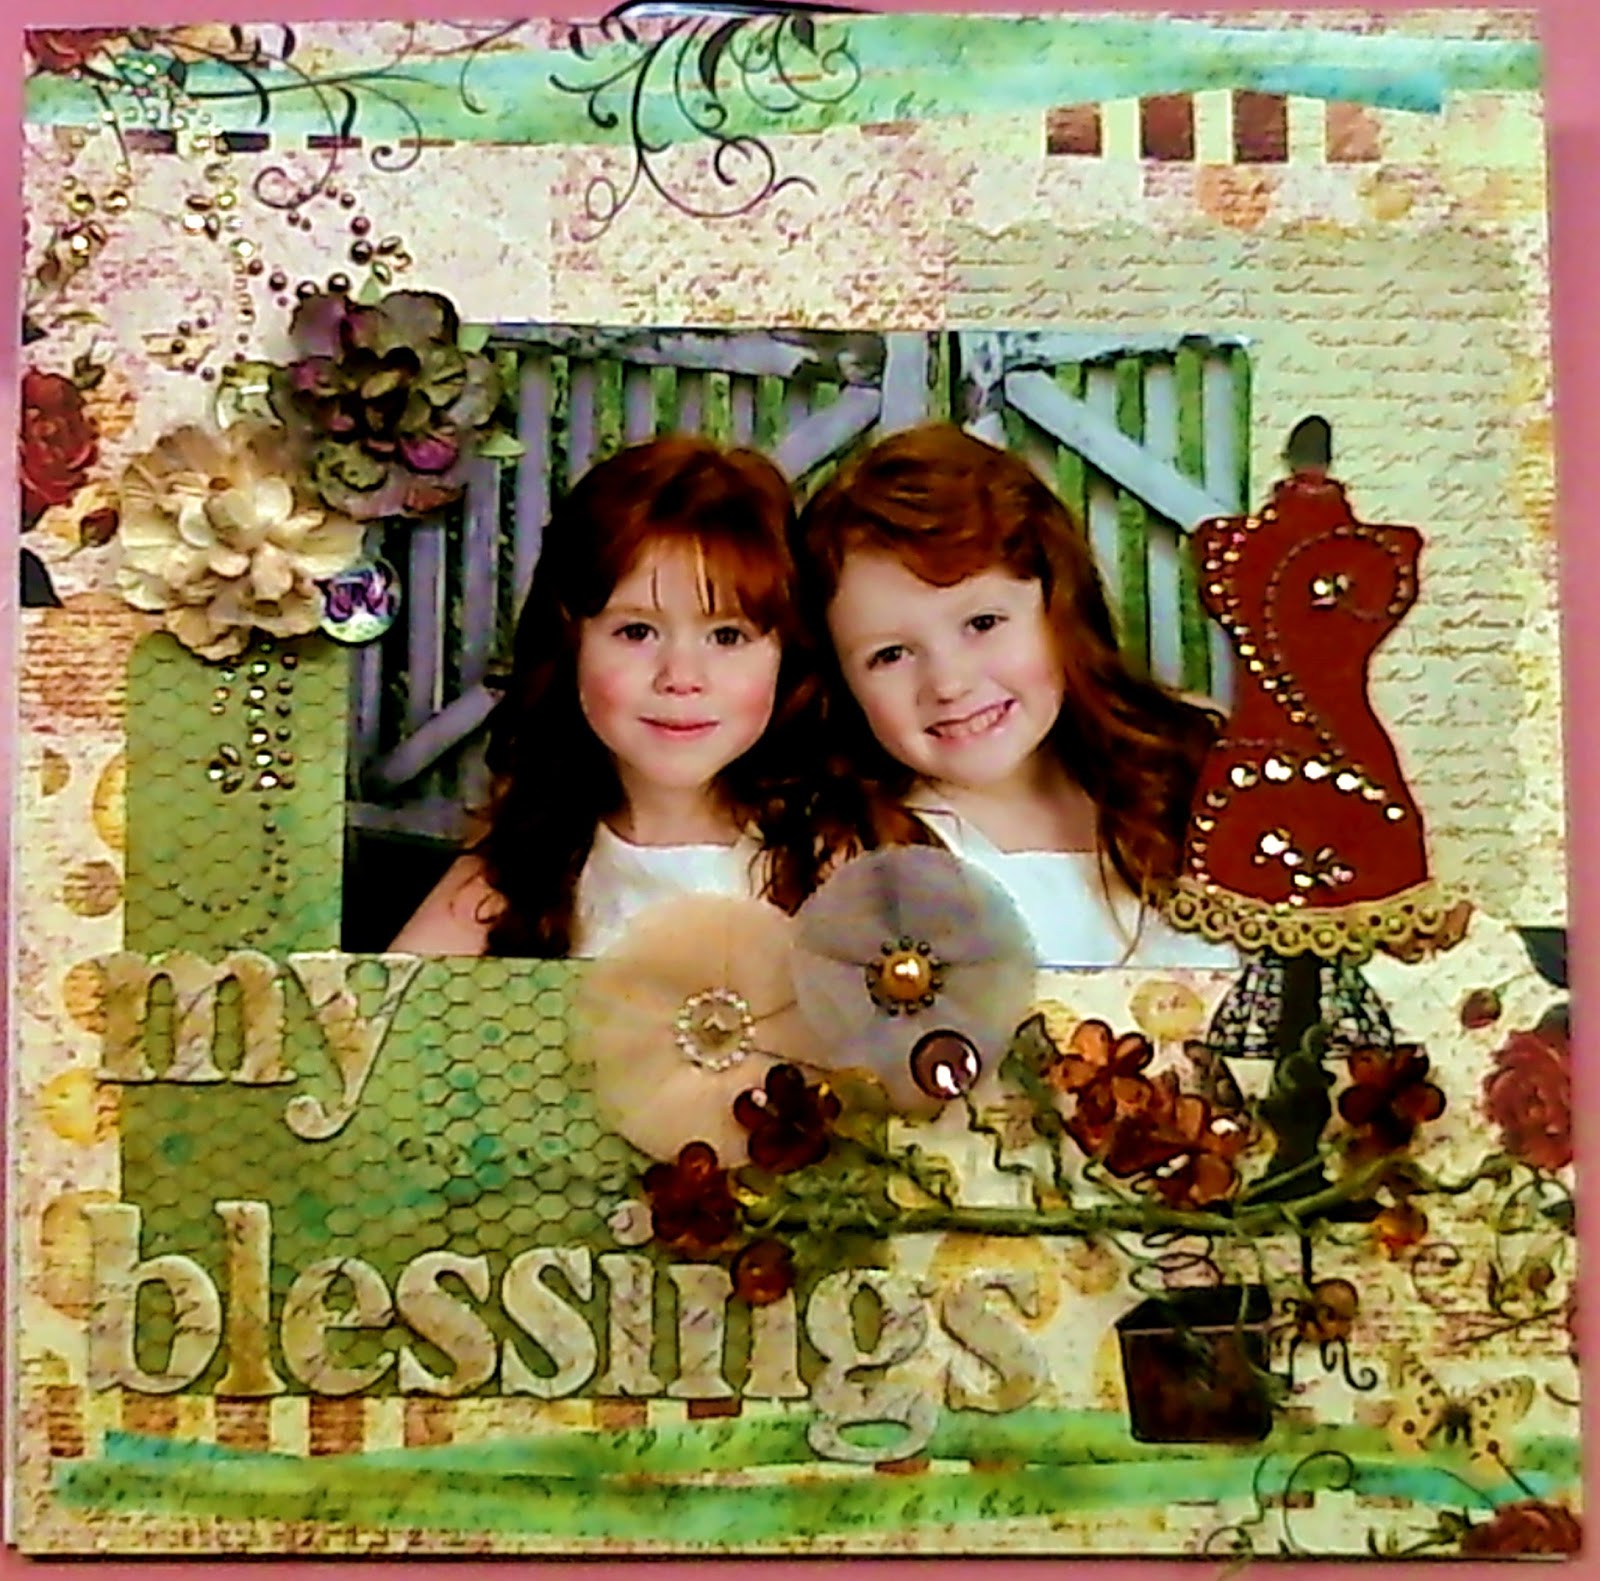
My Blessings

Whoa, here I am posting a project, I know it's been a while. I really have been making things the truth is I just hate uploading photos from my camera to my computer, then editing and then adding to the blog...
For this post I was able to cheat a little and use my webcam to take the pictures (of my project in progress) and they are automatically uploaded to my photo file so it's a lot less hassle. I know you're thinking "how lazy can she be?" I really am THAT lazy!
Now on to my layout...
(clicking on the photos will make them larger/easier to view)
I used Prima's August build-a-page sketch for my starting point (if you go check out the sketch on Prima's blog you'll see I didn't follow it very closely) The back ground paper is from the Prima Pastche collection and this sheet here is "heart strings". The other papers that my photo is placed upon are also Prima, from the 6x6 inch Backstage paper pad. I chose relatively plain/monochromatic pages from that pad so that I could stamp on them with a couple of my large background stamps (one is a script, the other is from Prima called Hexagon - but I call it chicken wire :) ) I used Saddle Brown Staz-on ink  so that I could use my glimmer mist and glimmer glams over top of the designs and they won't run or smear.
For my page title I used a Prima chipboard font and I painted the letters I needed with "Hayride" Glimmer Glam. I find it easier to paint them while still on the sheet - they stay put and I don't lose any letters before I get them stuck down (don't you hate it when you are trying  to position your letters and one comes up missing, usually one that you didn't have an extra one to begin with?)
So I placed my title on the page using Helmar 450 quick dry. Yes, those alphas are self adhesive, but I don't want them falling off later on down the road. With Helmar backing up the adhesion I know those suckers are there for good!
Next I added the bling. A dress form shape cut out of chipboard with the "body" of it covered in linen fabric that I colored using Santa Baby Glimmer Mist. I dressed it up with some Prima Pearls and Crystals swirls and a little piece of Prima lace trim that I colored with the Hayride Glam. I also glued all that down with the Helmar 450 quick dry - it really is the all-in-one glue. I also added a couple of Prima flowers to the bottom of my daughters' photo.
Lastly, I finished it up with a couple more Prima flowers, a beautiful Prima vine and a couple of Pastiche pebbles that I tucked in beside the flowers on the upper left corner of the photo. All adhered down with - you guessed it Helmar 450.
I also wanted to mention that all the crystal and pearl swirls on this layout came from one package, I just cut them apart to make them go a little further ;)
I get nearly all of my supplies at www.YourMemoriesHere.com because I really like the owner :)
I hope you'll take the time to count some of your blessings today.
HUGS,


Wednesday, December 1, 2010

Christmas Cookies (take two)

Yesterday I posted this layout on the YMH Designs blog and the photo was just horrible. Well, I'm back with more (and better) photos.

Here is my two page layout using 2 Sketchy Thursdays sketches.

On this page you can kinda see the glimmery sparkle of the Tattered Angels New limited edition Santa Baby glimmer mist. We have several of the new winter colors in stock at Your Memories Here. I sprayed it on the solid red background paper of both pages.

I also used the same patterned paper on both pages to to keep them similar while using two different layouts for each page. This page is based on this weeks current Sketchy Thursdays challenge.

I just love the little cookie cutter embellies that I found, they are so perfect for these pages.

The title letters on the banner (and Cookies on the opposite page) are velvety flocked stickers. The beautiful green Prima lace trim has a nice Christmas feel to it. And the bright cheery colors are perfect for the fun photos and activity.
I know I say it all the time, but these sketches really help me get caught up on my scrapbook pages. It seems like the only time I'm creating layouts for my own personal use, is when I'm participating in one of these challenges! These photos are from 2008, so it looks like I have a lot more catching up to do!

Tuesday, August 31, 2010

Wanna Join Me At Sketchy Thursdays

This week Your Memories Here is sponsoring the sketch challenge at Sketchy Thursdays.
Here is the sketch:

And here's my take on it:

I pretty much kept to the sketch except swapping a couple of Prima flowers for some of the circles.
The burgundy papers are from the new "Not So Traditional Christmas" kit and the other papers are from the SEI Windsor paper pad. I used my Cricut and the Plantin Schoolbook cartridge to cut out my title.
The prize up for grabs is this "Spooky" Halloween scrapbook kit from Pebbles Inc. And for more fun I've added two Hallowhimsy Snag 'em stamps and a bottle of the new Fall 2010 Pomegranate Glimmer Mist.


So head over to Sketchy Thursdays and submit your layout for a chance to win those spooktacular goodies just in time for Fall.
Be sure to visit the YMH Design team blog to see what the rest of the design team did with this sketch too.

Saturday, July 10, 2010

A Lilyboo and Sketchy Thurdsay's

Hi, I hope every one is having a great weekend. I'm having a fabulous weekend, actually my whole week has been great! Kevin has been on vacation since the 4th and we've just been busy doing things around here like riding our 4 wheelers and hiking at Old Man's cave.
So here's my layout for this week's Sketchy Thursday's challenge.
I colored up a Lilyboo digi "garden trellis" that is perfect for my layout, cuz I really do love my garden. It's not much (about 4'x9' raised bed) but that's all the room we have. I'm just happy I can have any at all :)

Since I had a couple of picks of my garden and wanted to include them all, I made a little fold-y flap to hide my other two photos behind my colored image.

See - when it's all closed up, you'd never know they are back there!

Thursday, June 17, 2010

My First Digital Layout


I used a freebie digital set from DCWV to create this layout. It is called the "the Guy Digital Kit" so I'm guessing it's like the paper stacks and accents you can buy in the stores all bundled up in a digital set. This is my very first time playing with digital scrapping and overall was pretty easy. Of course I must tell you that I was already pretty fluent with my Printshop software (which is what I used to create this) so that may be why it was easy for me?
I'm happy with the way it turned out, but I think I'll still do most (like 95%) of my pages the old fashioned way :) I love the ability to create whatever element I want for my pages, versus being limited to what's available in digital form. This does open up all whole new range of uses as far as hybrid scrapping goes.
For my layout I used this weeks Sketchy Thursdays sketch for my page. I definately recommend using a sketch when creating a digital layout. It makes it go soooo fast. Just drop the elements on the page as shown in the sketch! Why do I feel like I'm cheating though?
So, anyone else like to dabble in digital scrapping? I'd love to hear about it.

Wednesday, June 9, 2010

Baby Shoes

For today's post, I was able to wrap up a few challenges in one layout (I just love when it works out like that). For the theme of this page I played along with These Are A Few of My Favorite Things challenge blog. They are having a HUGE celebration over there with lots of prizes and all you have to do is make a project with your favorite shoes!
I used this week's Sketchy Thursdays sketch for my layout. I pretty much followed the sketch exactly because it really worked for this page.
And the last challenge is from Practical Scrappers, where they want you to bust out your eyelets and put them to use.

I used a solid, dove gray card stock for my background that I embossed using my Pebbles baby stencils to make the little foot prints ( I actually have a YouTube video for how to do this HERE) I splashed the background with some tutti fruiti Glimmer Mist (which it was so difficult for me to do, I was sooo worried I was going to mess it up) Then I sprayed all over the background with dazzling diamonds glimmer mist.
The title is part stamped pink acrylic paint with my Pebbles foam stamps and the "shoes" part is just hand written and heat embossed with some vanilla embossing powder.
The flowers are Prima Sprites and I attached them with a couple of pink eyelets.
I added a little journaling block at the top right corner which reads: "My favorites shoes weren't actually mine. They were Marlee's very first pair. Sure she had cutesy baby booties type shoes, But these were her first "real" walking shoes.
For my photo, I edited it on Picnik to make it all black and white except for the little pink flower accents.

Saturday, April 24, 2010

Foster's Dream

Happy Saturday! I wanted to share a layout with you today of our dog, Foster. He's such a goofy dog. He falls asleep in the middle of the room flat on his back like this:
He doesn't even wake when the girls come running in. About the only thing that will get him up is yelling at our cat, Arney. Then Foster jumps up for "duty" (he thinks it's his job to police the cat)
For my layout I used DCWV Nana's Kitchen paper. The great doggie image is a brand new release Lily-Boo's Boutique digi ( you can click those words or use the link in my side bar) I cut the "dream bubble" out on my Cricut using SCAL. The little bone cut is a Sizzix die.

Here's a close up of my colored image. This is one of the six in the dog set. I'm guessing this must be what Foster is dreaming about to sleep so soundly.

Friday, April 23, 2010

Strawberry Picnic

I made this layout of my two girls sitting in their play house having a "picnic". They like to sit at their little picnic table and have snacks when the weather is nice.
For my layout I used Mimosa paper for the background. I love the gradient pink to light peach colors and the sparkle of the glitter (they look like little asterisks) The patterned paper squares are DCWV Sweet Stack mat. The journaling block and strawberry were both cut on my Cricut. I used some green Flower Soft on the stem of the strawberry for some different texture. The lace trim across the bottom is Prima lace and it comes cream, but I just rubbed a pink ink pad across it to make it match my page's colors. The little chipboard girls are Basic Gray and the title is Thickers they both were given to me by Suzanne (I won her blog candy).
I have been wanting to play along at some of my favorite challenge blogs so this week I got to it and covered a bunch!
Sketchy Thursdays - the page layout
Practical Scrappers - ribbon, floss or fibers
Bitten By the Bug 2 - From My Kitchen ice cream tab cut
Scrappy Frog's - Pick 3 I chose : die cuts (strawberry), no coloring (the raw chipboard shapes) and lace (Prima lace)
Cricutters Anonymous - picnic theme

Sunday, March 21, 2010

Baby Album

I am finally able to post the photos of a project that I've been working on.
My friend Brigitte is expecting a baby boy at the end of May. Yesterday was her shower and I made her a scrapbook album for his first year. I set the pages in order of "months" and "holidays" as they would occur in chronological order from his birth. I used K&Company's Itsy Bity Boy paper stack for most of the "month" pages and the other pages are probably DCWV patterned paper. The solid card stock is Bazzill and card stock packs from Joann's. I used my Cricut for all the cuts (some are from cartridges and some are SCAL) All the words are cut with SCAL using the Comic Sans MS font. Any embossing was done with my Cuttlebug. I am so sorry about the quality of some of the photos, I took these in a hurry yesterday right before I left for the shower and I can't re-take them because Brigitte has the album now ;)


By the way, this is an 8"x8" album and all the photo mats are 4 1/2" x 6 1/2" so she can easily fit a 4x6 photo on each one.

Saturday, February 27, 2010

Multi-Crafting

Like so many of you I am a multi-crafter. What I mean is paper crafting isn't my only hobby. I've been busy (O.K. not really busy it took me a couple of hours) sewing a couple of tiny little aprons for my daughters (4 and 2 years old). What happened was I got a great deal (I'm sure some of you know what I'm talking about) on a pair of "flirty" aprons and my little girls just loved them. However, these were made to fit women of all sizes but definitely not little girls who still wear toddler sizes! So off to Hobby Lobby for some fabric. I let them each pick the pattern for their apron. Marlee chose the Princesses and Lilee picked Strawberry Shortcake (or as she likes to say "Stawberry Cupcake").
Now on to the multi-craft part. I had to scrap a page of them wearing their new aprons.

I used this week's Sketchy Thursdays sketch because it's a great sketch and Your Memories Here is this week's sponsor! I rotated the sketch but kept the proportions pretty much the same. The background paper is DCWV Nana's Kitchen (appropriate for an apron layout?) I cut out the apron on my Cricut using the From My Kitchen cartridge. The purple card stock and the apron are both embossed with the Cuttlebug Swiss Dots folder (though it's hard to see that detail in the photo). Thanks for stopping by to take a look today. I hope you'll head over to Sketchy Thursdays to play along and share your own take on this sketch.

Tuesday, February 23, 2010

Got Dirt?

Here'a another look into my hillbilly life style ;)
This layout has been in my "to do" pile for a while now.

In the summer we like to spend out weekends in the woods on our ATVs when we can. I got brave one trip and took my camera along.
I made the cuts on my Cricut using Plantin for the title font and Camp Out solutions for the 4 wheeler. I tried to give the 4 wheeler cut some interest by adding Stickles but I'm not loving it now :( I wrote my journaling on a Chatterbox wood tag and attached it with some glue dots. I felt with all the mud that the page was a little blah, so to give it some "bling" without being "girly" I added 3 sets of Dew Drops by each photo all from the Sunflower mix.

I embossed the title with my Cuttlebug Diamond Plate embossing folder though it's a little hard to see in the photo. There is a second page to this layout but it's going to have to wait for another day to get finished.

Tuesday, February 9, 2010

Poor Arney

I just had to share this:

This is our cat, Arney. Yes, he is a boy. Our girls got some Build-a-Bear critters for Valentine's day from their Aunt Di and they came dressed in cute little Valentine's outfits. Marlee likes to undress all her toys so this one was laying on the floor and I thought *hmm, wonder if it will fit the cat?* He was not at all happy and I quickly removed it, but not before I snapped a couple of pictures :)

On to my real post for today...
I made this page for this week's Sketchy Thursday's sketch and for the YHM Share Your Memories February theme "catch up". Because this is from our vacation to Tennessee last June (yeah, I'm still working on those pages). The story behind this page is while we were on vacation Lilee didn't want to eat anything. We'd order her meal, she'd take a bite or two and then she'd say "I'm done". So by the second or third day, I started taking pictures of the foods Lilee wouldn't eat (what can I say, I'm always planning my scrapbook pages). Sorry the picture quality is poor, I'm fighting my fluorescent lights in my new scrap space. They are great for lighting to work by, but not for taking pictures.

Friday, January 15, 2010

Just Us

Here's a page I made using this week's Sketchy Thursdays sketch:

The layout is of me and my hubby (Kevin). It's been a looooong time since I scrapped a page about just us. Like 5 years long! I'm always making pages about the kids or our family so I though one of just us was over due.

Here's a little background info about me and my husband: We're Parrot Heads (for those of you who don't know what that means, we LOVE Jimmy Buffett) We got married on the beach in Florida and had our wedding reception at Margaritaville, we've got all of Jimmy's CDs (and a couple of albums) We've been to several concerts, in fact Kevin has been to over 20!

So this layout is the two of us at the Buffett concert last June. As you can see by the photo we were having a really good time :)

I used a Chatterbox wood frame to "capture" my ticket stub (I just love using memorabilia on my pages when I can) the frame is decorated with a couple of Prima Flowers and dew drops for the flower's centers. There are a couple more Prima flowers on the page and some golden berry dew drops here and there in the corners for accents. I used my Cricut machine and SCAL software to cut out the background shape and title. I added lime green stickles to the tilte for some extra shine. The background paper is from the DCWV Stack 6.
I never thought of myself as a "sketch user" I always wanted my pages to be my original ideas. Then I realized that sketches are a really just a tool to help get you started. You don't have to follow them exactly and a little inspiration here and there never hurt :)I hope you'll feel inspired today to do a little crafting.

Thursday, November 19, 2009

Challenges

They're so much fun to play along with. I read my fair share of blogs daily and always want to join in on the challenges that some of them post but usually don't get the time to complete the projects or I forget until it's too late and miss the deadline. Well, recently there have been some good one's that I just couldn't pass up. Here's a couple of projects:
This is something I've had in the works for MONTHS(I know, what took me so long?) It's a cookie sheet that I turned into a magnetic memo board. All I did was paint the edges with some light blue acrylic paint, adhered some patterned paper (the blue floral matches a chair I re-upholstered years ago that lives in my scrap room) I added a pretty velvet ribbon and done! The little round containers have a magnetic backing and they came on my Prima Mini cans (attached to the lids)
The little frames are also painted with the same blue acrylic paint and they are being held on with those Prima flowers that I turned into magnets by first gluing them to over sized brads adding a Prima leaf and a button center and then glued the brad to a craft magnet. I plan on having hubby drill a couple of holes so I can hang it up with some ribbon. So that covers the Practical Scrappers challenge to use acrylic paint on your project.
Next is a layout of Marlee's first day of pre-school for this year (I know, again what has taken me so long?)
This page was based on this weeks Sketchy Thursdays sketch. The background patterned paper is from the Paper Studio (Hobby Lobby) and the circle, cut at 5.75" on my Cricut with George, is from the Scrapbook Wall Papers pack (Gallery Floral). It's kinda hard to read in the photo (bad lighting) but the bottom ribbon, which is pink, has words on it that say: FUN, Happy, laugh, giggle, smile, celebrate, together. I think those are all things that describe Marlee's experiences at school. She just loves it and Lilee can't wait till next year when she gets to go.
The title is store bought flocked stickers (Paper Studio) They weren't quite pink enough for this (they looked almost white on the page) so I got out my Pebbles chalks and dusted them with some darker pink chalk. Worked perfectly, in fact I'm thinking I should go buy a bunch of white ones, cuz they're on sale right now, now that I know I can make them any color I need :) The flowers are Prima and so are the pink rhinestones.
Well that's all of my challenges for today, who knows what tomorrow will inspire?

Wednesday, October 7, 2009

Dalenee's Debut

Here's a layout of my darling niece Dalenee and her first visit with my girls (her cousins). These photos were taken when she was just a couple of weeks old. I got permission from her mommy to show her off to you :) Marlee and Lilee just adore their new little cousin. I can see the slumber parties at my house in about 4 more years!
How 'bout that onesie she's wearing? Yep I'm the "auntie" that loves her so.
Now on with the page details:
The background paper is Me and My Big Ideas, the photo mats are Paper studio (pink polka dots) and DCWV mat stack (pink plaid) The chipboard "d" is Heidi Grace and the rest of the title was cut out of DCWV mat stack paper on my Cricut with SCAL in two different fonts. Then I chalked the edges of the letters for some depth. I found that "Dalenee" was a little hard to read in that patterned paper so I added some stickles and it made a huge difference! The little letters that spell out "cousins" is from Queen and Co. along with the little photo tabs on the bottom photo mat. The cute, pink, peek-a-boo tear bear was hand torn by me and embellished with some shimmer chalks and a tiny Prima flower. The ribbon and flower charm on the top photo are from my stash. I think that covers everything, but if you have any questions just let me know.

Wednesday, September 30, 2009

Marlee's Tea Party

Here's a two page layout I've been working on for about a week. I finally got it finished, thanks to some new beautiful Primas I just got in the store. Marlee decided to host a tea party one weekend when her Grandma, Great Grandma (known as GG) and Aunt Diann came to visit.

It didn't photograph as well as I would have liked it to but I couldn't take the picture outside today because of the super gust of winds. Maybe I'll be able to get a better photo tomorrow. If you click on the picture it will enlarge it.
The details are pretty long so stick with me ;)
The background paper is DCWV Nana's Kitchen, the photo mats are DCWV Sweet Stack cut out with my Cricut and SCAL scalloped ovals. The title is Prima Signs of Spring paper cut on my Cricut with SCAL "Missed Your Exit" font (I also used that font for the computer printed journaling) The cute little tea set was cut on my Cricut with the Everyday Paper Dolls cartridge, I shaded the edges with Pebbles pastel pink chalk and stamped the flower pattern on the larger pieces, then I attached them with pop dots for more dimension. The flowers and leaves are Prima. For the centers of the flowers I used both Dew Drops (island blossom) and the Prima Pearls and Crystals collection(light pink).
Click on the highlighted words for direct links to those products in the store. If you'd like to brows our new Prima products and all the other great goodies visit Your Memories Here. I almost forgot to mention, ANY purchase over $50 gets you free shipping in my store!